First expeditions
Do your first Curse of the Dead Gods experience, I explain the blessings, weapon management and choice of rooms!

Choose your blessings
In order to avoid spending too much money but still have good blessings, here are the ones I recommend. You can therefore keep the money to unlock the altars (see below).
- Sich'al's Favor: 1000 gold and 5 perception from the start, also helps to avoid using too much corruption
- Protection of T'amok ': Fire illuminates further and 20% reduced damage in light
- This one is more free, inexhaustible thirst for more endurance during greed kill or fury of the flesh to more easily kill the bosses
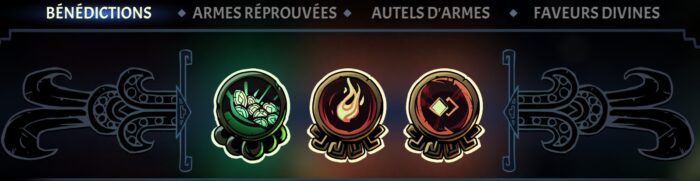 The first blessings to unlock, a big advantage without bleeding!
Choose your weapons
The choice of weapons is a little more personal, I advise you to first try them all a little and then unlock the type of weapon that suits you. Avoid unlocking weapons to block them, it is expensive and is therefore rather reserved at the end of the game. For example I like the claws for their speed and the bombs for their area of effect, so I unlocked all of them. weapons of this type. You can also possibly unlock their cursed weapons in a second step.
 Claws and bombs, it's my hobby!
Improvement of altars and divine favors
For altars, be careful, it can quickly be expensive. I advise you to follow this order, in order to maximize the effectiveness of these. We will prioritize the main weapons because they are the most versatile and will allow you to get by in any situation, unlike for example two-handed weapons which will be more complicated to manage on the bosses.
- Restored altars then main weapons
- Two-handed weapons
- Secondary weapons
- Restored altars
- Main weapons
- Main weapons
- Restored altars
For divine favors it's easier, unlock the first three and stop there, it starts to cost too much later. You can unlock them later, especially when you have successfully completed the altars.
 Unlock only the first divine favors
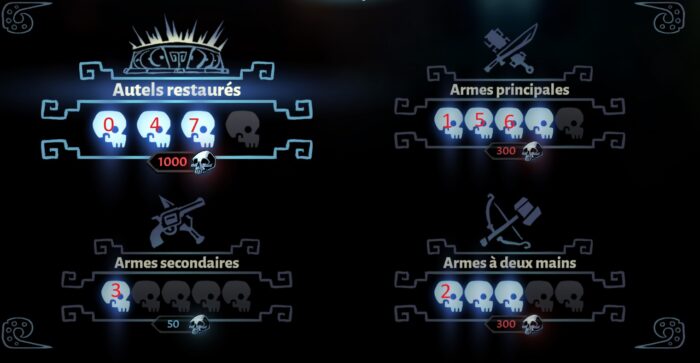 Here is the order of the altars to unlock and upgrade
Choose your rooms
In order to optimize your runs, here are the rooms that I recommend, and those to avoid:
- Relic : very useful - one of the keys to winning, to combine with favors to find the right ones
- Performance : useful - one of my favorite rooms, more damage to your weapon!
- Stats : useful - also handy to increase stats, damage, health and loot
- Test : medium - you have a limited time to collect a small bundle of gold, but no equipment
- Happiness : average - while waiting for a treatment set up
- Or : medium - to collect a little gold but also chests, on the other hand no choice in the drops and gold collected quite low. Handy if you are really short
- Poor : almost useless - I strongly advise you to collect your weapon before your expedition, or possibly to make a weapon room from the start to recover it
- Unknown : almost useless - avoid relying on luck to find your way! To be taken if, for example, you have an unknown or care choice. The piece will be one of the above mentioned
- Safe deposit box : almost useless - it will be very complicated for now to properly manage these safes
Boss management
A special feature to manage bosses well, but don't worry, I won't spoil you! The bosses work roughly always the same way, an attack phase or multiple attacks and a waiting phase. You must at all costs wait until their attacks are finished before attacking in your turn, it will be much easier to manage your stamina, and to avoid running out of dodge by dint of having too much. attack.

The first expeditions should be easier to manage, so that you can start collecting resources and unlock the game content!
By Alchemists, May 2021